This page is dedicated to the most complex, unconventional, and most difficult to operate aeroplane in X-plane 11 to date, the Tu-154M by Felis.
This is a step-by-step walkthrough for a normal flight. We will use conventional navigation, Orthodromic navigation with Doppler radar and operate the KLN90 GPS as a backup.
Because the real Tu-154 is has a crew of 4, and we are going to fly on our own, expect a high workload at times. Maximum use of the autopilot, good flight planning and a good understanding of the aircraft systems are key elements for a successful flight.
Although I encourage to fly this aircraft in the Russian setting so you can enjoy the full ambiance of an airliner of the Soviet Union, for the sake of this tutorial I will fly it in the English layout.
Media:
Complete Tu-154 for X-plane series on youtube
Requirements:
- X-plane 10 or 11. This tutorial is written with version: X-plane 11.05 (Payware)
- Tu-154M addon by Felis (Payware)
- Also install the latest updates
- XNVU calculator by Vantskruv
Mastery of the Russian language- Nope! this model now comes with optional English cockpit layout!
Optional:
- Up to data X-plane navigation database, helpful but not essential. (Payware)
- Better pushback as alternative of using reverse thrust to back off the gate
Before starting X-plane
Seriously! don’t start x-plane yet! and if you just did, close it… unless of course, you wish to add every waypoint in the GPS manually! The KLN90B only reads the flight plan files at X-plane start up.
Also, before starting the sim I recommend to download and install custom scenery for the airports you plan to use. Then connect and calibrate the joysticks and grab that bottle of водка from the fridge 😉
Prepare a flight plan:
To generate a flight plan, I use Skyvector because it is easy to use, and free of charge.
https://skyvector.com/

Keep in mind that the Tu-154 is not Prnav approved, and every waypoint with a turn increases the workload significantly. So try to plan a route with long legs and overflying conventional aids (VOR or NDB) where possible.
Today we will be flying the route from Vilnius to Plovdiv.
EYVI DUKAT1B DUKAT M996 OSMUS P727 BUKOV P159 FLR N181 TIMUR N731 LUKOV N127 LARAT N739 PDV LBPD
Open the XNVU.exe utility.
If this is the first time you use this utility, it is necessary to adjust some settings. In the top bar, go to Settings and setup the folders for XNVU to find its data from.
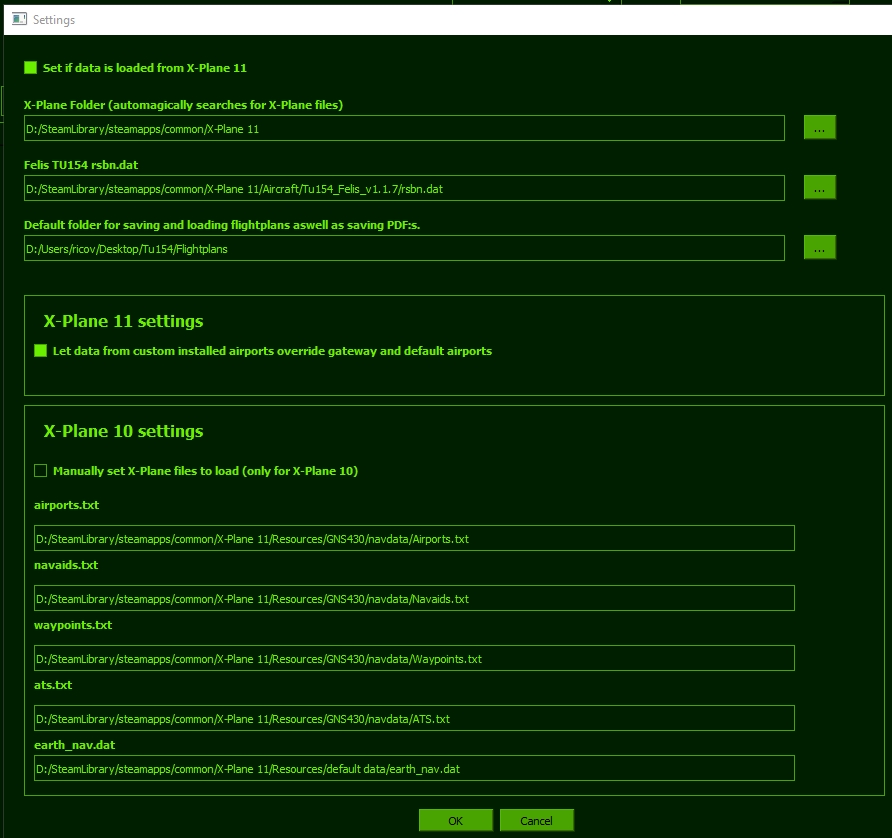
Close the settings page when everything is setup.
Copy and paste the route string into the ‘insert route’ field at the bottom, include the airport codes at the start and end of the route, remove any sid and star’s. then press ‘Insert before’
EYVI DUKAT M996 OSMUS P727 BUKOV P159 FLR N181 TIMUR N731 LUKOV N127 LARAT N739 PDV LBPD

If a waypoint is missing fro mthe XNVU database:..
.. then you can manually add a waypoint. On the top, select Settings/XNVU Library/Create new…
The fill in the identifier, name and country code, the LAT/Long need to be converted from degrees/minutes/seconds, to degrees/decimal.
For example, 531412N0063838E, convert seconds to minutes and minutes to decimal:
Lattitude ((12/60)/60)+(14/60)+53 = 53.2366667
Longitude ((38/60)/60)+(38/60)+006 = 6.64388889
Now that the entire route is in XNVU, we need to modify it to suit the 1990’s navigation equipment. For the KLN90b GPS, we can only have a maximum of 30 waypoints. for the NVU, we need to remove all waypoints that are not a turn.
So if we compare the route in skyvector with the route in XNVU, we can see that DUKAT is our first waypoint, then NOPKA and then OSMUS, however NOPKA in not a turn point, so we won’t need it. Select waypoint and click ‘Delete waypoint’.
Do the same for BUSIN, GANVI and ROMLU, but leave PNK in! do this for the rest of the route.
Now we are going to add correction beacons to the route. You can do this manually by right clicking on a waypoint, or chose Utils/Autogenerate correction beacons.
![]()
Once finished, click on the top bar Export/Print “Print…” or “Print to PDF…” to generate an NVU navlog.
Then click “Export to KLN90B…” and call the file 1.fms (1-25 but not 0)
Now you can start X-plane 11. Ensure the option of start with engines running is OFF and the flight is started at the Gate or ramp.
Ground equipment
- On the left hand side of the screen, click on MENU SERV GND
- Click Change Language to switch between Russian or English
- GEAR BLOCKS on
- SENSORS and ENGINES COVERS removed
- PAX DOOR 2 AND LADDER 2
- GROUND POWER connected

Before you get started, make yourself familiar with the location of the various systems in the flight deck. There is not much time in flight to search for a switch or button.
Flight Engineer panel [FE]
Overhead panel [OVHD]
Main instrument panel [MAIN]
Pedestal [PED]
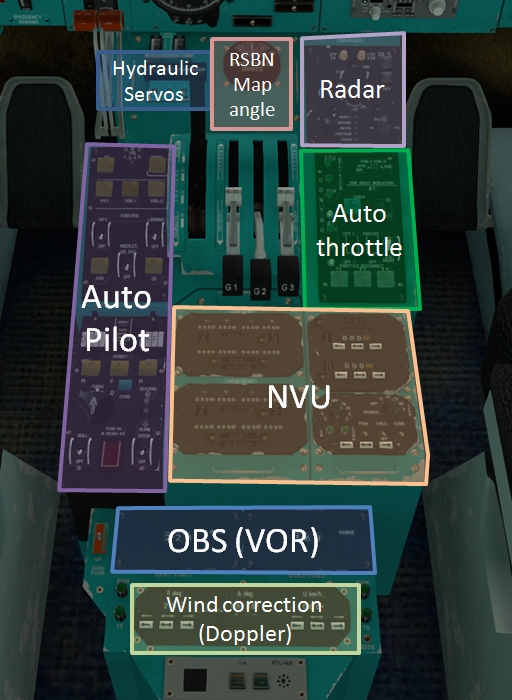
Throughout the procedures, look for the location in brackets, for example, [FE-ELEC] means the system can be found on the electrical panel in the Flight engineer station.
Initial power up
- Batteries ON (N1 N3 N2 N4) [FE-ELEC]
- EXT PWR on
- RECT N1 and N2 on (DC inverters)
- FROM BAT lights extinguish
- Cockpit lights ON [FE -Internal lights]
- Nav-lights ON [FO side panel]
- Lamp tests (8x) [one test button on each panel]
- APU panel
- Engine panel
- Fuel panel
- Air-conditioning panel
- Servo Hydraulic panel
- Doors annunciation panel
- Fire protection system
- Main instrument panel (FO side)
- Fire protection system [FE-FIRE]
- AGENT ARM
- Test SMOKE DETECTORS and FIREeXtinguisErS
- Test main horn [FE-Caution and warning]
- CHECK

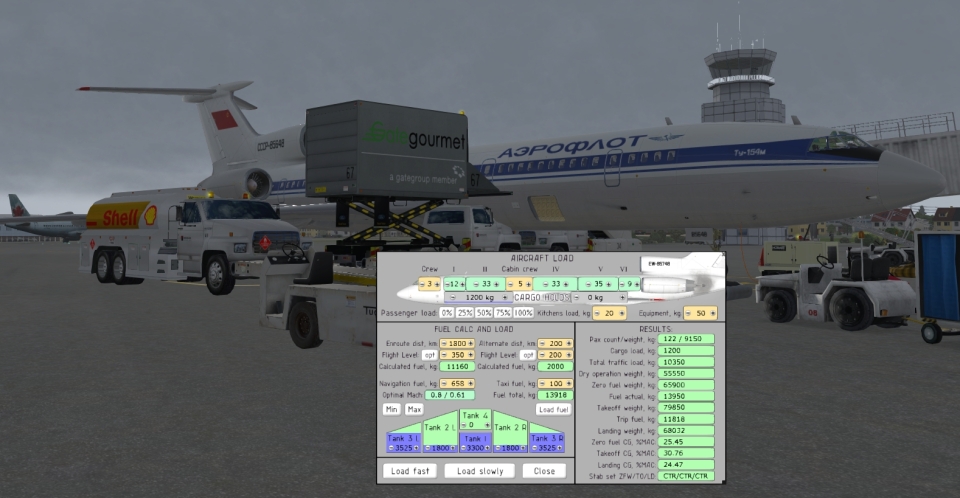
Load sheet and fuel
- Aircraft load utility (left side, MENU SERV LOAD)
- Set ‘Enroute dist, km’
- So take the distance in NM
- Add headwind, (for example, 50 knots headwind for 2 hours, add 100NM)
- Add up and then multiply to 1.852 to convert NM to KM
- In my example ( 850Nm + 100 Nm for headwind ) * ~1800KM
- Set ‘Alternate dist, km’ the same way.
- Click load fuel
- Add payload, and ballast to remove reds/orange fields
- and “load fast” or “load slowly”
- Set ‘Enroute dist, km’
Note: Load slowly will add a fuel truck animation but does not work when the APU is on!
APU start
- APU power switch to START [FE-APU]
- Crank switch START
- Check: Door open, Fuel press, Ready to start lights ON
- Press START pushbutton
- Monitor start
- Check: Normal speed light ON
- APU power switch ON (AC systems panel)
- If bleed air is required, hold the AIR BLEED switch up (~10sec) until the READY TO START light is out
You can start the APU at a later time if you wish, but when it is cold, use some APU bleed air to warm the cabin.
Navigation setup
Note: you can setup more or less avionics at this stage, otherwise after engine start. keep an eye on the APU amps. It is a weak generator so keep power use low.
- Obtain ATC clearance
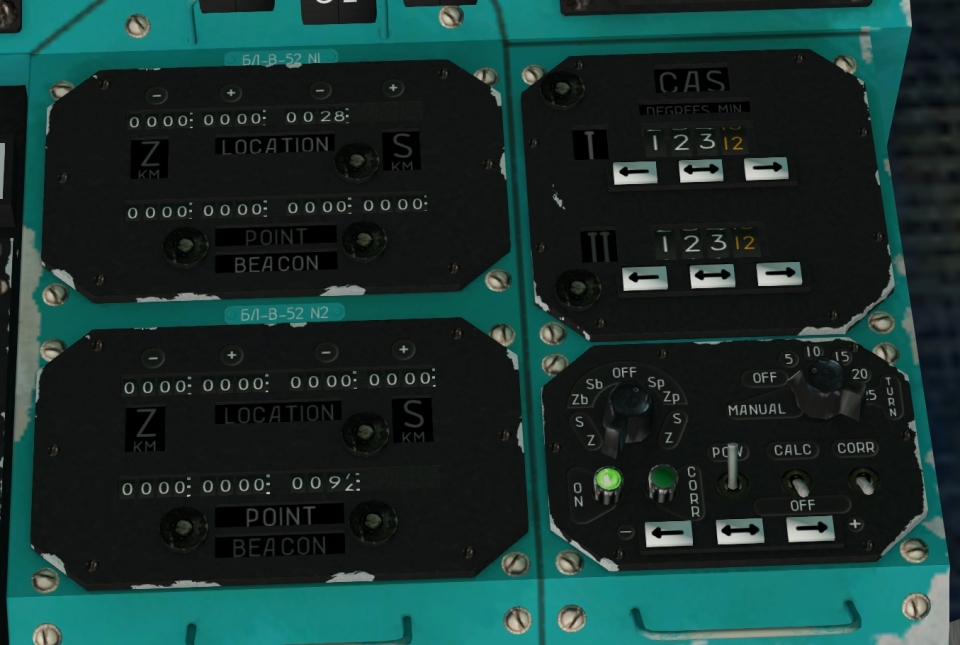
- NVU setup [PED-NVU]
- POW (power) on
- CAS I Set first course from NVU flight plan 123:12
- depress the middle button to toggle fast/slow
- CAS II Set second course from flight plan 123:12
- Rotate selector left to S, left arrow to set first leg ‘S’ from the flight plan as a negative -28.0
- Rotate selector to Sp, set leg distance from second leg as a negative -96.4
Note, Even when the NVU is not used for navigation, NVU power must be on for auto-flight with GPS navigation.

- KLN 90B setup
- Select KLN power ON [OVHD]
- Press PUSH ON [Main panel GPS unit]
- Set QNH with the right rotary switch
- you can change InHg or mb in SET 7 page
- Select Acknowledge and press ENT
- Use Left rotary switch to page FPL 1, 2, 3 or whichever number
- Left CRSR button to highlight USE?, then ENT
- For a full screen moving map, set both sides to NAV 5 page
- VOR/DME setup
- Course MP N1 and N2 ON [OVHD]
- Set VOR frequencies, Miles or KM (113.8)
- Set radial with COURSE switch on the CKNI/VOR panels [PED] (123deg)
- Set CDI on HSI left and right [MAIN]
- Set Heading bug to runway heading (195deg)
- ADF
- Set frequencies and CHAN (channel selector) (385khz) [OVHD]
- VHF
- VHF N1 and N2 ON
- Set VHF frequencies
- Altimeters
- VBE N1 and N2 On
- UVID on (standby altimeter)
- Set Alt-select, Meters or feet [MAIN]
- Set Altimeters (phone, weather, EYVI)
- Digital (2x) to QNH or QFE and feet or meter as per procedure
- Mechanical ft and hPa on QNH
- Mechanical meter and mm/hg QFE (zero meter)
- Transponder
- VSI Left and TCAS on [OVHD]
- Transponders standby (2x) [OVHD] and [MAIN]
- Set transponder code
- AHZ AUX (Auxilary art horizon) on (Aft Overhead panel)
- RADIO-ALT on (2x)
— Continue after doors closed —
Before start
- Cabin signs on (2x) (Captain overhead)
- Ensure APU is on and connected, external power switch is OFF
- Signal ground to Remove all ground equipment except the GEAR BLOKS.
- Check doors closed and locked on the upper FE panel
— Request start clearance —
- Beacon light ON (FO side panel)
- Hydraulic systems charge (FE panel)
- PTS-250 n1. Inverter ON
- Electric pumps 2 and 3 ON (check APU amps!)
- Hydraulic system 1 to 2 cross feed OPEN
- Charge emergency brake accumulator ACCUM CHARGE
- Hydraulic system 1 to 2 cross feed Close and Guard
- Electric pumps 2 and 3 OFF
- PTS-250 n1. Inverter OFF

- Check Parking brake set. (Captain left knee)
- Signal ground crew to remove the Gear blocks
- Align Fuel system (FE panel)
- Fuel quantity indicators ON
- Tank 2 L R
- Tank 3 L R
- Tank 4 only when there is fuel in it
- Service tank (4x)
- Equalizer ON and AUTO
- Fuel MNGN on and guard
- FLOW METER
- FUEL QTY IND on and check content
- Fire wall switches OPEN (3x)
- Engine instruments ON (3x) (lower right FE panel)
- Flight deck door closed
- Departure briefing, prepare take-off data card (MENU MISC TAB)
- Voice recorder V.REC ON
- Flight recorder (Upper right FE panel)
- POWER MSRP
- REC-MAIN
- REC-AUX
- BEFORE ENGINES START checklist
Note: do not turn on fuel pumps when elect-hydraulic pumps are on. It would overload the APU generator
— Ready for push and start —
Pushback
- I recommend to use the ‘better pushback’ utility.
- At night only: Flashlight ON (assign a key command)
- Plugins/Bettter Pushback/Pre-plan pushback
- Nosewheel steering OFF (white toggle switch on the yoke)
- Plugins/Bettter Pushback/Start Pushback
- Request pushback clearance before releasing the parking brake
- Transponder ALT OFF
Engine start
- APU ‘AIR BLEED’, hold until READY TO START light extinguishes (APU panel)
- Open ENGINE START ON GROUND panel door.
- MAIN SWITCH ON, check STARTER AIR PRESSURE.
- Crank switch to START
- Start engine 1
- ENG SELector to engine 1
- HP fuel valve 1 ON
- Press START pushbutton
- Generator 1 CHECK, red light extinguished, then CONNECT
- Check respective generator Amps
- Repeat start for engine 2 and 3
- MAIN SWITCH OFF
- Crank switch to CRANK
- Close ENGINE START ON GROUND panel
After engine start
- APU
- APU power OFF (AC systems panel)
- AIR BLEED CLOSE, check READY START light ON
- SHUT DOWN pushbutton
- APU power OFF and CRANK (when RPM is zero)
- Air-conditioning
- Engine bleed valves ON (3x)
- MASS AIR SUPPLY ON (2X)
- PRESSURISATION VALVES L R hold up ~10 seconds
- Temperature regulators AUTO (5x)
- LEFT and RIGHT SYS selector to 0 (up)
- Cabin pressure selector 650 mb ABSOLUTE
- Pressure difference to 0.6
- ICE DETection system
- ON
- Test
- ANTI-ICERS ON if required (5x)
- Windshield heat LOW (3x)
- Pitot heat TEST (ON 3 minutes before departure)
- SERVO HYDRAULIC POWER on (9x) [FE flight control]
Avionics power up (aft overhead panel)
- Aft electronics panel set
- Upper row all on except AP FD, GYRO HEAT, IAS HEAT
- Lower row all on except: TRA67A, RSCN RECORDER, AUDIO
- Doppler system
- POWER on
- GROUND or SEA
- NAV, NVU by TAS
- ADF
- COM (2x)
- Compass system setup
- Set Latitude on the compass system:
- Set mode selector to MAG
- ADJUST MENT (main gyro)
- CORRECTION REF (right side)
- ADJUST MENT (reference gyro)
- Set mode selector to DG
- ADJUST MENT (reference gyro)
- CORRECTION MAIN (right side)
- ADJUST MENT (main gyro)
- Check all Directional gyro indictors (5x)
- Test and reset AoA and G meter
Systems setup
- Turn on Hydraulic busses (3x) (Booster control, guard with cap)
- Set Stabilizer setting and trim
- Check flight controls
- Autopilot setup
- Open ARREST cap and push both buttons (left pedestal)
- ATT test control 1, and 2, then guard (aft overhead)
- Check attitude indicators (no flags)
- Check no VG fail indication
- AP FD power on and guard, (aft overhead) (audible alert)
- Check ABSU ready light (FE panel nav computer)
- Needles ON AHZ
- PREPARE NAV
- ROLL and PITCH channels on
- Auto-throttle
- PEPARE ON and Guarded
- Weather radar
- ON and RDY mode
- When the green light is on, select METEO (not before pushback, save your ground crew from radiation)
- Nose wheel steering on (forward) (yoke)
- Extend Landing lights (2x)
- BEFORE TAXI checklist
— Taxi clearance —
- Transponder ALT OFF
- Taxi-lights on (2x)
- Check brakes
- Check gyros in the turn
- ON TAXI checklist
— When taxiing outside of congested area —
- Flaps 15 or 28
- Confirm Cabin secure signal received
- Review V-speeds and takeoff brief
- NVU
- CALC
- Turn anticipation as required.
- BEFORE LINE-UP checklist
Before take-off
— On the runway —
- Radar METEO
- Transponder TA/RA
- Pitot heat 3x
- Doppler PWR on, Ground or sea, NVU by TAS
- Confirm runway heading correct
- Nose wheel steering to 10 degrees and guard
- BEFORE TAKEOFF checklist
— Cleared for takeoff —
- Landing lights on LANDING
- SIGNAL LGTS IN FLIGHT on
Take-off
- 95% RPM
- Positive rate, Gear up
- Landing lights, off and retract
- Climb with V2 minimum, up to 40km/h more is better
- Acceleration altitude (1500ft?), accelerate to 450 km/h
- Flaps, retract per schedule (see speed card)
- Landing gear handle neutral (mid position)
Note: 250Kt below FL100 = 463 KM/H, level flight power approx 77-83% RPM
Set climb power ~90% or a temperature of ~500c should work fine.
Auto flight
- When desired, press STAB to engage autopilot
- Select directional mode
- No mode, using the TURNS switch on the autopilot panel for steering
- CH for heading bug mode
- NVU for NVU or GPS (toggle switch on main centre panel
- VOR-1 and 2 for VOR (remember to set radial in HSI and on pedestal!)
- Altitude mode
- Pitch hold, (default) control with pitch wheel
- V for Velocity (speed) hold
- Select directional mode
- Acceleration altitude
- Reduce pitch with pitch wheel, aim for 500-1000ft/min climb.
- Accelerate to 550 km/h
- V for airspeed hold
- Transition altitude
- Set altimeters to 1013
- Passing 3000m or FL100
- Accelerate to 550km/h
- Check pressurisation
- External lights as required
- Cabin signs as required
- Change-over altitude
- Monitor Mach number, at the desired mach number select M for Mach hold
- Level off
- 1000ft before level off, reduce pitch to maintain 500-1000ft/min
- Reduce power to maintain speed (normal cruise power ~90% RPM)
- On reaching, Press H to maintain current flight level
Orthodromic Navigation
After a steep learning curve, it is not extremely hard to navigate using the NVU, however it requires almost constant attention of the pilot so it becomes a distraction from other tasks. Also a simple wrong input can ruin the navigation completely so you have to work extremely accurate and double check your numbers every time!
The Tu154 is designed to operate close to the north pole, where a magnetic compass is no longer reliable. Instead, the magnetic variation of the departure point is held in the gyro-units, until a change-over point somewhere along the route, where the gyros are transferred to the variation of the arrival airport.
Therefore the nav-log has a few fields that require some more explanation.
- All numbers in red are used before the transfer of the gyros.
- Numbers in blue are used there after
- For basic navigation:
- OZMPUv is the Orthodromic course based on the departure airport
- OZMPUp is the Orthodromic course based on the arrival airport
- S is the leg distance in KM
- For correcting the gyro compasses with the KM-5 units
- Pv and Pp are the difference between the local and the orthodromic variation
- For automatic correction with the RSBN beacons
- RSBN is perhaps easiest explained as the Russian equivalent of VOR/DME
- Sm and Zm are the location of the RSBN beacon relative to the next waypoint
- Map Angle is the angle with reference to the RSBN beacon, required for corrections
Before switching to NVU navigation, we have to ensure that the navigation computer is setup correctly. After the initial input from the navlog, there are several ways to do this.
- Updates the position using an RSBN beacon. However this is quite labor intensive, and only available in the former Soviet Union.
- Fly a departure with VOR/DME ending at the first NVU waypoint. When passing the fix, manually switch waypoint or switch the NVU on
- Overfly an NDB enroot en manually switch the NVU on.
NVU automatic navigation
- Set NVU/GPS switch to NVU (centre main panel)
- Doppler
- Set NAV to NVU BY DOPP on the overhead panel
- Set DOPPLER in GROUND or SEA mode (for overflying land or water)
- Select NVU on the autopilot panel for automatic navigation
- Monitor distance to next waypoint on NVU calculator
- Set TURN selector to 5km. (10 or more for very sharp turns at high speed)
- 5km before reaching the next waypoint it will switch from waypoint I to II and vice versa.
- Set the next course (to waypoint 3) in CAS I
- Ensure selector is in Sp and change pre-select distance for waypoint 3 (negative value!)
- Repeat the last step pretty much until you can start the approach with conventional radio navigation.
RSBN correction
- Ensure you have sufficient time on this leg, I recommend at least 100km remaining to the next turn
- Set Sm and Zm value of the current leg in the NVU (select Sb and Zb if the language is set to English)
- Set the map angle on the MAP ANGLE DEGREES dial on the forward pedestal
- Set RSBN channel on overhead panel and confirm the beacon is in range (RSBN indicator is moving)
- Set autopilot PREPARE NAV mode OFF
- On the NVU computer, set CORR on, and after the correction is made, switch it off again
- Fly the aircraft back on course using the turn knob, when the Z is 0km, (and the needle is in the centre) engage PREPARE NAV and NVU mode again
Manual position update Z km using DME
- When flying directly towards a DME station, and the distance is more than 100km, you can adjust the Z value on the NVU to correct distance to the station
Manual position update S km using VOR or NDB
- switch CALC mode off
- Manually fly the aircraft to the beacon (on autopilot use heading or turn mode)
- Setup the NVU for the next leg according to the navlog.
- When overhead the beacon, reengage CALC mode
Switching magnetic reference using the fork
This procedure should be done at any point in the orthodromic navigation part of the cruise.
- Set autopilot PREPARE NAV mode OFF
- Note the Fork, deg. value on the top of the nav-log
- On the overhead panel, set CORRECTION to REF and DG
- Manipulate the COURSE SET switch
- Adjust the reference gyro, see the change at main gyro instrument.
- The small arrow should change by the value of the fork
- And after the correction, point at the new navigation course in the plog (blue)
- Set the CORRECTION to MAIN
- Repeat for the main gyro
- Adjust the NVU computer
- Set blue values for course in the CAS windows (both active and standby course)
- Select Z and reduce Z value to zero
Correcting gyros in flight using KM-5 units
- Set autopilot PREPARE NAV mode OFF
- Note the Pv or PP value (before or after transfer of the gyros)
- Set the KM-5 units to this value
- On the overhead panel, press and hold ADJUST MENT
- In DG mode, repeat for both CORRECTION MAIN and REF
Before descent
- Review arrival briefing
- Tune and set radio beacons
- Switch to conventional navigation
- NVU automatic turn anticipation OFF
- Passengers signs on
- Set stabiliser setting
- Top-up hydraulic accumulator
- ON TOP OF DESCENT Checklist
- Select cleared flight level on altimeter (FL, altitude, Feet or Meter)
- Select M on the autopilot for Mach hold
- Slowly retard the power levers to idle
- Monitor airspeed, at 550 km/h, select V on the autopilot for Speed hold
- When cleared to an altitude below the Transition level, set QNH or QFE
- Autopilot PREPARE, NAV off, LANDING on.
- AFTER PASSING TRANSITION FLIGHTLEVEL Checklist
- 450KM/h below 3000m or FL100
Base turn
- Reduce speed to Flaps 0 speed
- Extend gear, retract speedbrake
- Gear handle off
- Localiser alive: Flight director APP mode
- Glide slope centred: Flight director GS mode
- If required, Autothrottle S (speed hold)
- reduce speed and set flaps per schedule
- When flaps 36 or 45 are set:
- AFTER ILS ESTABLISHED checklist
After landing
- Nosewheel steering to 63
- Flaps up, reverser stowed, speedbrakes retract
- Radar OFF
- Pitot heat OFF
- Transponder to ALT OFF
- Window open for depressurisation (or dump valve)
After parking
- Taxi light OFF and retract
- Park brake SET
- Window open for depressurisation
- Seatbelt sign OFF
- AFT overhead electrical switches OFF and GYRO GAGING
- DOPPLER off,
- all radios off
- Windshield heat off
- Connect GPU or APU generator (not for last flight of the day)
- Bleed air and air conditioning OFF
- Engines OFF
- Fuel system switches OFF
- Air data recorder OFF
- Ice detection OFF
- Fire protection as required
- Beacon light OFF
- Gear blocks, doors and stairs
Pilot notes
- Minimum runway required for dispatch: 1900m
- Minimum ICAO Fire Cat 6
- NVIDIA recording: Record video with Alt+F9, settings Alt+Z, screenshot Alt+F1
Install notes:
Tu154 updates:
- Purchase and first time install from http://store.x-plane.org/Tupolev-Tu-154_p_492.html
- Download from: https://forums.x-plane.org/index.php?/forums/topic/104605-tu154-updates/
- Download latest version and unzip to …\X-Plane 11\Aircraft
- Download KLN, follow install instructions in install.txt
Optional: update X-plane Navdata
Note: not required but it may be necessary to manually enter waypoints by lat-long in XNVU
Optional: Better pushback utility
- Download latest version and unzip to …\X-Plane 11\Aircraft
https://github.com/skiselkov/BetterPushbackC/releases
XNVU:
- Download from: https://forums.x-plane.org/index.php?/files/file/34331-xnvu-calculator/
- 38.zip (or latest version)
- zip
- Unzip both to desktop
- Open XNVU.exe
- Settings/Set x-plane folders
- Set x-plane 10 or 11 data
- Location for Felis TU154 rsbn.dat is in the Tu154 aircraft folder
Translation
- Instruments
- УС-И-6 (airspeed),
- УМ-1 (Mach)
- ИДР-1 (DME)
- ПКП (ADI)
- ПНП (HSI)
- УВО-15 (metric alt.)
- ИКУ-1 (RMI)
- РВ-5М (radio alt.)
- УШ-3 Main navigation instrument (centre main panel)
- КМ-5 №1 и №2, (Manual gyro correction, FW of FE panel)
- Systems
- ДИСС DISS = Doppler measurement of speed and drift
- Panels
- ТКС-П2 Gyro control panel (overhead panel)
